How to Master Wood Floor Filling for a Flawless Finish
Why Wood Floor Filling Matters More Than You Think
I have spent the better part of two decades working with wood floors in London, and if there is one thing I have learned, it is that the difference between a good restoration and a great one often comes down to how you handle the gaps. Whether you are dealing with a Victorian terrace in Islington or a modern loft in Shoreditch, the principle is the same: the surface is only as good as what lies beneath it. Wood floor filling is not just about aesthetics, though that matters plenty. It is about structural integrity, about preventing drafts, about stopping dirt and dust from collecting in crevices that seem to multiply overnight.
A lot of homeowners I meet assume that a quick sand and a coat of varnish will sort everything out. They are surprised when I point out the gaps between the boards, sometimes wide enough to fit a coin edgewise. Those gaps are not just cosmetic problems. They can cause the floor to shift, create squeaks, and let moisture into the subfloor. That is where professional restoration comes in, and why wood floor filling deserves more attention than it usually gets.
The Right Filler for the Right Floor
Not all fillers are the same, and the choice depends heavily on the wood species you are working with. Oak, for instance, is dense and tends to move less than pine. Pine is softer, more prone to expansion and contraction, and it can be a nightmare if you use a rigid filler that does not flex with the seasons. I have seen beautiful pine floors ruined by a cement-based filler that cracked within a year. The trick is to match the filler to the wood's behaviour.
For most domestic floors in London, a water-based wood filler works well for small cracks and knot holes. For larger gaps, especially in older floors, you might need a two-part epoxy or a proprietary gap filling compound. Brands like Bona and Osmo make excellent products for this. Bona's range of fillers is particularly good for matching the colour of your floor, especially if you plan to stain or lacquer afterwards. Osmo's hardwax oil based fillers are another strong option, especially if you want the filler to blend seamlessly with the surrounding wood.
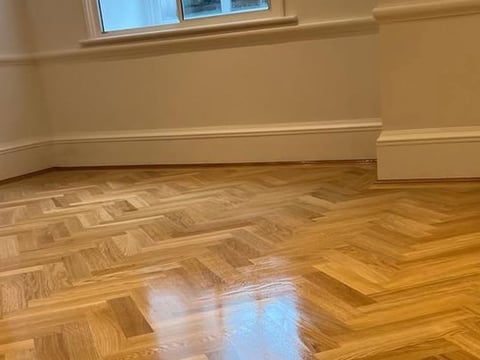
If you are working with a floor that has been treated with oil or wax in the past, you need to be careful. Some fillers will not adhere properly to an oily surface. In those cases, you might need to sand back to bare wood first. That is where the phrase "wood floor filling" can become a bit of a technical process, but it is worth the effort. A properly filled floor will last for decades, whereas a rushed job will show its flaws within months.
Preparation: The Real Work
Before you even think about applying filler, the floor must be clean and dry. I cannot stress this enough. Even a trace of dust or old wax can prevent the filler from bonding. Start with a thorough vacuum, then use a tack cloth or a damp mop to pick up the fine particles. If the floor has been previously finished with polyurethane or lacquer, you will need to sand it down to expose the raw wood. That is where dustless sanding becomes invaluable, especially in a residential setting where you do not want to coat every surface in fine dust. Modern dustless sanding systems, like those used by professional restoration teams in London, can keep the mess to a minimum while still giving you the clean surface you need.
Once the floor is prepared, you need to consider the moisture content. Wood is hygroscopic, meaning it absorbs and releases moisture from the air. If you fill gaps in a damp season, the wood may shrink later and the filler will sit proud. If you fill in a dry season, the wood may expand and push the filler out. The ideal time to fill is when the wood is at its average moisture content, usually around 8 to 12 percent. A moisture meter is a cheap tool that saves a lot of headaches.
Application Techniques That Actually Work
When it comes to applying the filler, technique matters more than the brand. For narrow gaps, a flexible knife or a spatula works well. Press the filler deep into the gap, not just across the surface. For wider gaps, you may need to work in layers, letting each layer dry before applying the next. Do not be tempted to overfill; it is better to apply a second coat than to leave a thick, uneven ridge that will take forever to sand flat.
After the filler has dried, usually overnight, you need to sand it flush. Use a fine grit, around 120 to 150, and sand in the direction of the grain. If you sand across the grain, you will leave scratches that show up clearly under a coat of varnish or oil. This is where the experience of professional restoration really shows. A novice might sand too aggressively and create a dip around the filled area. A pro knows to feather the edges so the filler blends seamlessly into the surrounding wood.
I remember a job in a Georgian townhouse near Bloomsbury where the client had tried to fill the gaps themselves. They had used a cheap wood filler from a DIY store and applied it with too much enthusiasm. The result was a mess of lumps and uneven patches. We had to sand the entire floor back to bare wood and start again. That time, we used a two-part filler from Pallmann, which is a brand I trust for large gaps. The finished floor was smooth, uniform, and the client could not tell where the filler ended and the wood began.

Finishing: The Final Touch
Once the filling and sanding are done, you have a blank canvas. How you finish the floor will determine its look, feel, and durability. If you want a natural, matte appearance, hardwax oil is a great choice. Osmo's Polyx Oil is a favourite of mine for oak floors because it brings out the grain without making the surface look plastic. For a more durable finish, especially in high-traffic areas, you might opt for a lacquer or a polyurethane. Bona's Traffic HD is a water-based lacquer that holds up well in commercial spaces.
Stain is another option if you want to change the colour of the floor. But be careful: stain will highlight any imperfections in the filling. If the filler is not perfectly smooth or if it absorbs stain differently than the surrounding wood, the result can be patchy. I always test the stain on a hidden area first, or on a sample board. That is a piece of advice I picked up from an old issue of This Old House, and it has saved me more than once.
For oil finishes, tung oil and linseed oil are traditional choices, but they require more maintenance than modern hardwax oils. Tung oil, in particular, can take days to cure and can yellow over time. Hardwax oil, like the ones from Osmo or Pallmann, offers a good balance of protection and ease of application. It is also easier to repair later, because you can spot-treat a worn area without redoing the whole floor.
Common Mistakes and How to Avoid Them
One of the most common mistakes I see is using too much filler. People think that more is better, but excess filler just means more sanding and a higher chance of the filler cracking. Another mistake is not cleaning the gaps before filling. Even a thin layer of dust can prevent adhesion. And then there is the mistake of ignoring the movement of the wood. If you fill a gap in a floor that is about to expand, you will end up with a ridge. If you fill when the wood is about to contract, the filler will sink.
Another issue is colour matching. If you are using a coloured filler, try to get one that matches the wood when it is dry. Some fillers look perfect when wet but dry to a different shade. I always keep a few sample colours on hand, mixing them if needed. Bona and Osmo both offer tintable fillers that can be adjusted to match your floor exactly. For a floor that will be oiled, you can also mix filler with the oil itself to create a custom paste that blends perfectly.
Finally, do not underestimate the value of professional restoration. A good specialist will have the tools, the experience, and the product knowledge to do the job right the first time. They will use dustless sanding to keep your home clean, and they will know which filler works best for your specific wood species and finish. In London, where floors are often old and full of character, that expertise is worth every penny.

The Takeaway
Wood floor filling is not the most glamorous part of floor restoration, but it is one of the most important. Get it right, and your floor will look like a single, seamless surface. Get it wrong, and you will be staring at those gaps every time you walk into the room. Whether you are a DIY enthusiast or you hire a professional, take the time to prepare properly, choose the right materials, and apply them with care. Your floor will thank you for it.
And if you are ever in doubt, remember what I learned from years of working with oak, pine, and everything in between: patience pays off. A well-filled floor is a joy to walk on, easy to maintain, and it adds real value to your home. So next time you are planning a restoration, do not skip the filling stage. Give it the attention it deserves, and you will see the difference every single day.
Corrections
Spot something wrong? Send it to the desk and it gets fixed in the open.